SalesForce is a popular suite of online software focused on Customer Relationship Management (CRM). The connector in DocFusion allows you to use SalesForce Objects (sObjects) as data sources for your document templates and import their properties. Once added to your template's Data Schema, you can map Smart Parts to SalesForce properties and generate documents with them.
Add as many SalesForce connections as needed to your document's Data Model. This guide will show you how to create one.
Prepare your connection
Before connecting to SalesForce, an orientation of the connector dialog will help you to gather the details you'll need to make a successful connection.

Click the Data Model command in the View section of the DocFusion ribbon bar. The Data Model window opens.
In the toolbar, click Create SalesForce Property. A dialog box opens to specify the following settings:
- Instance URL: Specifies the URL of the SalesForce instance you want to connect to, along with a Connect button that prompts you to enter your SalesForce credentials and Managed App details to establish the connection with. The dropdown also remembers the URL's of SalesForce instances you have previously connected to.
- SalesForce Object: Once you have successfully connected to a SalesForce instance, this dropdown allows you to select sObjects to source data from.
- sObject Fields: A table that lists and allows the selection of data fields from the selected sObject to use in your template's Data Model. The Select All button includes all the sObject fields and Clear All selects none.
- Property Name: Specify the name of the entity that the selected sObject fields will be imported to in your template's Data Model.
- Property Occurrences: Specifies how you want to use the imported sObject data in your template, i.e.: as an entity data structure (tabular) or single-use (data-field).
- Generation-Time Auth Method: Allows you to specify what authentication method to use when connecting to SalesForce. This setting applies to SalesForce connections during document generation only. By default, DocFusion uses SalesForce Basic Authentication, but JWT (JSON Web Token) is also available.
 DocFusion Salesforce connector configuration window.
To summarize, you'll need details for your SalesForce connection, authentication, managed app, and sObjects to configure the DocFusion connector. The steps below will help you do so.
Steps
First, connect to a SalesForce Instance:
Begin by entering your Instance URL for SalesForce, then click Connect. The authentication dialog opens.
 SalesForce connection dialog in DocFusion.
DocFusion provides 2 methods to successfully authenticate with SalesForce:
- SalesForce Basic Authentication (Instructions follow): Use login credentials and Security Token to authenticate.
- JSON Web Tokens (Instructions further below): Use a certificate to sign a JWT request. This flow doesn't require explicit user interaction.
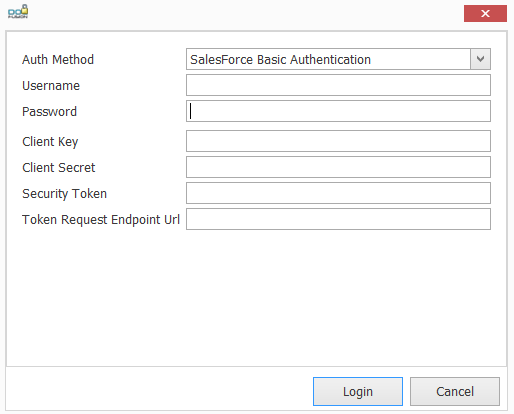
To authenticate using SalesForce Basic Authentication, provide the following details:
- Authentication Method: Select SalesForce Basic Authentication from the drop-down. This is the default connection method used by DocFusion.
- Username and Password: Type in your SalesForce login credentials that are authorized to access the required sObject data into the respective fields.
- Client Key and Client Secret: Also called Consumer Key and Consumer Secret in SalesForce. Both are generated by SalesForce when creating a Connected App. If you have not yet created a connected app, or have one but lost your Consumer Key and/or Secret, please see this guide.
- Security Token: Tokens are generated against your user account and are used globally within SalesForce for authentication. Enter yours here, or refer to the Reset your Security Token guide from SalesForce.
- Token Request Endpoint URL: The endpoint where your client sends a request in order to obtain an OAuth access token. The URL is dependent on the environment that you are connecting to (e.g. production, sandbox, etc), as well as the type of OAuth flow that you are using. While this field is not required, it is recommended that enter the specific URL.
Sandbox Environments:
- Set the Token Request Endpoint URL to: “https://test.salesforce.com/services/oauth2/token"
- Ensure that the Sandbox Name is appended to the end of the SalesForce username. E.g.: If the username for a production organization is [email protected], and the sandbox is named “test”, the modified username to login to the sandbox is "[email protected].”
For production environments, please use the following formats for Token Request Endpoint URL's:
- Web Server OAuth Flow: https://<instance_name>.salesforce.com/services/oauth2/token
- User-Agent OAuth Flow: https://login.salesforce.com/services/oauth2/token
Now, click Login. You will be returned to the connector window. Note that it may take a few moments before a connection is established. Status icons alongside the Instance URL field indicate the success or failure of your connection.
To use JSON Web Tokens (JWT) to authenticate with SalesForce, provide the following details:
- Authentication Method: Select SalesForce JWT Bearer Flow from the drop-down.
- Username: Type in the SalesForce username to use for the JWT flow.
- Client Key: Insert the generated key for the JWT flow.
- Is Sandbox Environment: Enable the checkbox if you are not connecting to a production instance of SalesForce. Otherwise, disable it.
- Certificate Load Method: If you are loading your X.509 certificate from a Certificate Store that is local to your DocFusion installation (On-Premises) then choose Subject Distinguished Name. If you are connecting to an online instance of DocFusion then select Filename to specify the certificate that will be attached to your template.
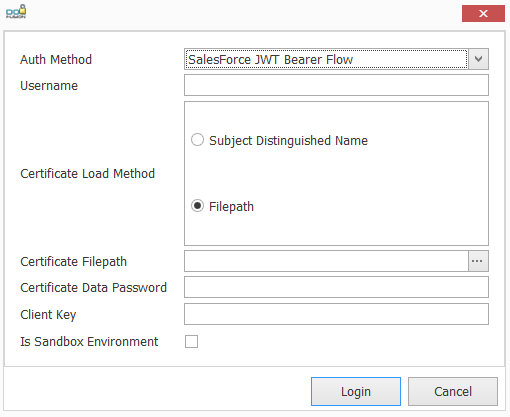
Notice that selecting a Certificate Load Method alters the configuration parameters on the connection dialog to match the requirements of the different methods.
If you have selected Filepath as the Certificate Loading Method, then you must provide the following details.
- Certificate File Path: The path to the locally stored X.509 certificate file. Click the ellipses alongside the field to browse for the file.
- Certificate Data Password: The password to access the X.509 certificate data. It is used when the certificate is loaded from a file rather that the Certificate Store.
Alternatively, if you have selected Subject Distinguished Name for the Certificate Loading Method, then there is only 1 connection parameter:
- Subject Distinguished Name: The name of the user of the X.509 certificate. This is a textual representation of the subject, or issuer, of the certificate.
Now, click Login. You will be returned to the connector window. Note that it may take a few moments before a connection is established. Status icons alongside the Instance URL field indicate the success or failure of your connection.
Next, select sObjects and its data fields:
Select the SalesForce Object that you would like to source data from using the dropdown in the SalesForce connector configuration window. This populates the table below with available data fields from the selected sObject. Note that it may take a few moments to retrieve the listing.
Now, use the checkboxes alongside each data field to select those that you would like to use in your template's data model.
In the Property Name field, give the schema property that will be added to your template's data model a name to identify it.
You also need to specify how to use the selected data fields in your template's schema. Navigate to the Occurrences dropdown:
- The Single option imports the selected data fields as Schema Properties, or individual data fields that will be used as variable data in your document template.
- Multiple is the default. It imports the selected data fields as an entity structure in your template's Data Model which can be referenced as its own data type.
Lastly, specify the generation-time authentication method:
The Generation-Time Auth Method setting applies exclusively to connections made to SalesForce from DocFusion during document generation. Select one of the following options:
- SalesForce Basic Authentication: This is the default setting. It authenticates using your SalesForce connection credentials.
- SalesForce JWT Bearer Flow: JSON Web Token is an authentication method that is available if you have a token signed by a private key and secret and a valid X.509 certificate.
Click Save. The data fields that you imported are now available in your template's data model, and ready for mapping to Smart Parts in your document template.