This guide helps you to setup a typical DocFusion workflow that configures and initiates SigniFlow signing requests. It can be applied to any document template using Workflow Designer. The workflow passes the document to SigniFlow to complete the digital signing process.
Typical Workflow

The functions of the activities used in this workflow are as follows:
- LogonToSigniflow: Connects to authenticates with the SigniFlow platform.
- CreateSigniflowWorkflow: Configure a SigniFlow request and create an instance of it.
- AddSigniflowWorkflowUser: Add collaborating users to the signing request.
- AddSigniflowUserField: Specifies the Auto Tags (aka: Mapping Tags) in the document template where the digital signing facility will be included.
- InitiateSigniflowProcess: Specifies the SigniFlow process to use, and start it.
All workflow activities related to SigniFlow can be found in the Workflow Designer Toolbox. You can also search for SigniFlow activities by using the Toolbox search bar.
Familiarize yourself with Workflow Designer. Take the tour...

Also note that errors are thrown for configuration settings that fail validation, or other error conditions. The details can be found in the stack trace.
1. Setup your workflow
Open Workbench and create a new workflow. Then edit the workflow using Workflow Designer. The Process Design widow opens. You'll find SigniFlow-related activities in the Toolbox.
The default workflow on the canvas is already configured to generate a document. You'll be extending this workflow for a Signiflow signing request.
To setup this workflow, you can use the GenerateDocument activity that's included in the default workflow. Alternatively, you can create a test workflow using the ReadFileContents and ConvertToBase64 activities that point to a local file.
2. Authenticate with SigniFlow
Authentication is necessary before initiating signing requests so it is always the first workflow activity when initiating SigniFlow requests.
From the Toolbox drag the LogonToSigniflow activity onto the canvas.
Now, select the activity and configure the following properties:
- The API Endpoint URL pointing to the SigniFlow instance. E.g. https://<instance-name>.signiflow.com
- UserName and Password to logon to SigniFlow.
- Ensure the Result is set to SigniflowAuthClient. This is the return object data type that contains the authenticated SigniFlow session and is used again in subsequent workflow activities for the same request.
 LogonToSigniFlow activity properties pane.
3. Define the SigniFlow request
Drag the CreateSigniflowWorkflow activity onto the canvas and drop it below LogonToSigniflow. This activity configures the signing request.
Now, select the activity and configure the following properties:
- Set Document to 'DocX64'. This configures the document to base64.
- Enter the document's filename in the DocumentName field.
- Select the correct Extension using the dropdown. This sets the filename extension and denotes the format of the document.
- In the Email section, set AutoRemind to Yes. SigniFlow will send email reminders to all users collaborating on the signing request.
- SendFirstMail is a boolean value. Set it to True. Sends an email notification of the signing request.
- Set SendWorkflowStepEmails is also a boolean value that must set to True. Update emails will be sent for subsequent steps in the signing request.
- Navigate to the DueDate setting and enter a date by which the signing request should be completed by users of the document.
- Next, select the Priority of the signing request by selecting it from dropdown options.
- Optionally, customize the DisplayName to label this activity and identify it easier on the workflow canvas.
 CreateSigniflowWorkflow activity properties pane.
4. Add a user to the signing request
Drag the AddSigniflowWorkflowUser activity next onto the canvas. This activity adds the details of signatories and collaborators who need to complete the signing request.
Now, select the activity and configure the following properties:
- Set AutoSign to False.
- Ensure the Result field refers to a WorkflowUser data type object.
- In the Process section, set SignatureWorkflow to SigniflowProcess. This associates the SigniFlow request to the signatory, whose details we'll set next.
- Now, enter the user's FirstName, LastName, FullName and EmailAddress in the user section. Optionally, add a contact number to the MobileNumber field.
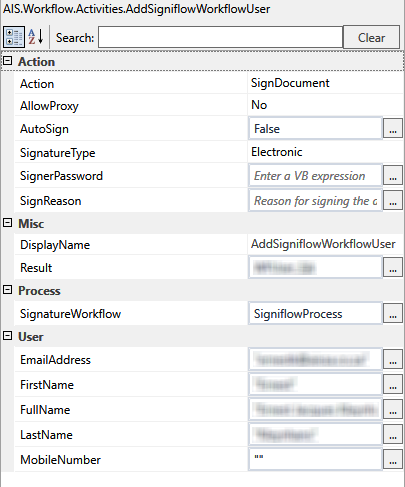 AddSigniflowWorkflowUser properties pane.
5. Map the template signature fields
You now need to define the Auto Tags (also called Mapping Tags) in the document template that indicate where signature fields should be inserted. This is where signatories will sign the document.
Drag the AddSigniflowUserField activity onto the canvas and drop it at the bottom of the current flow.
With the activity selected, configure its properties as follows:
- Set FieldType to Signature from the dropdown list. Specifies that type of field to replace the Auto Tags with.
- The Name property specifies identifies the field.
- Enter the TagName. This is Auto Tag string used in the document template to indicate where the signature field should be inserted.
- In the Location section, set the Height and Width. These are pixel values that specify the dimensions to render the signature field in the document. Optionally, you can also set the X and Y Offsets in pixels to better position the signature field.
- Ensure the User field value is the object type returned from the AddSigniflowWorkflowUser activity.
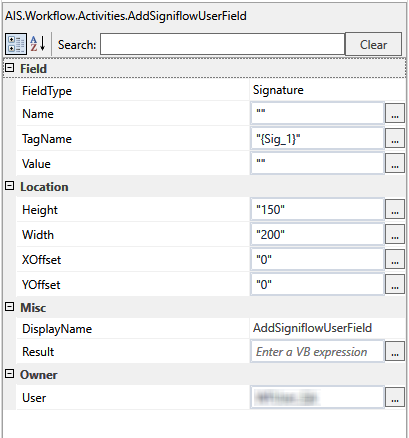 AddsigniflowUserField properties pane.
Make sure you make the tag text white so it dowsn't appear over the signature field
6. Initiate the SigniFlow request
Lastly, configure the actual signing request.
Drag the InitiateSigniflowProcess activity onto the canvas and drop it at the bottom of the current flow.
Configure the activity properties as follows:
- Set AuthenticatedClient to SigniflowAuthClient. This is the authenticated session object returned from the LogonToSigniflow activity.
- Ensure the SignatureProcess field is set to the defined SigniFlow process object, i.e.: a return object with the FullWorkflowRequest datatype.
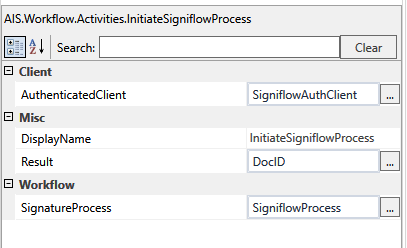 InitiateSigniflowProcess properties pane.
 That completes the workflow. You can now test it.