Microsoft Dynamics365 is a Customer Relationship Management (CRM) software that can be used as a data source using a DocFusion connector. This guide shows you how to setup and use the DocFusion connector.
Add the Dynamics365 property
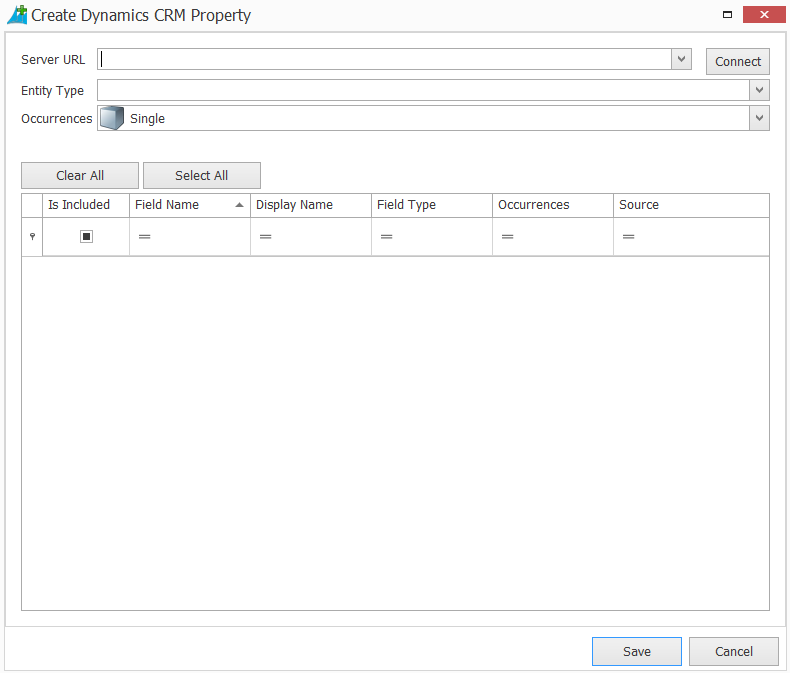
Open the template's Data Model from the View menu in the DocFusion ribbon bar. Now, click Create Dynamics365 Property in the toolbar. This opens the connector dialog.
Authentication Options
Connect to Dynamics365 by specifying the Server URL and clicking Connect. The authentication window opens.
The connector supports three authentication methods
Client Secret
Office365
Active Directory
.png "image(23).png")
A status icon alongside the Server URL indicates the success or failure of your server connection, along with a relevant error message if any.
ClientSecret Authentication
Preferred Online Method
Prerequisites
Create an Azure Application: This involves registering an application in Azure Active Directory. For detailed instructions, see Azure Application Registration.
Key Points to Consider When Registering the Azure Application:
Select Single-Tenant Authentication:
When choosing the supported account type, select "Accounts in this organizational directory only". This limits authentication to users within your organization's Azure AD tenant.
Configure Redirect URI:
Generate a new GUID (Globally Unique Identifier).
Set the Redirect URI to
app://{new-guid}, replacing{new-guid}with your generated GUID.This URI uniquely identifies your application during the authentication process.
Create a Client Secret:
Under the Client secrets section, click on + New client secret to create a new secret.
Important: Copy the client secret immediately after creation, as it will not be displayed again.
Set Up API Permissions:
Navigate to the API permissions page.
Click on Add a permission and select Dynamics CRM from the list of APIs.
Add the necessary permissions, such as user_impersonation.
Note: For Microsoft Graph API permissions, you need to select Grant admin consent for [Your Organization Name]. However, for Dynamics CRM, this step is typically not required.
Link the Azure Application to the Dataverse Environment: Ensure that the application has the necessary permissions to access the Dataverse environment.
Application User Creation
To link the Azure Application to the Dataverse environment, you need to create an application user:
Sign in to the Power Platform admin center as a System Administrator.
Navigate to Environments and select your desired environment.
Click on Settings.
Under Users + permissions, select Application users.
Click on + New app user to open the Create a new app user page.
In the Application ID field, select your pre-registered Azure AD application.
Assign appropriate security roles to the application user:
To allow querying all records, assign the System Administrator role.
Alternatively, add the application user to a team with the required permissions for more granular control.
Note: It's best practice to assign the least permissive role necessary for your application's functionality to adhere to the principle of least privilege.
Important: Ensure that the application user has the necessary permissions to interact with the Dataverse environment according to your application's requirements.
Required Parameters for Authentication
App ID: Obtain from the Azure Application.
Client Secret: Obtain from the Azure Application.
Redirect URI: Obtain from the Azure Application.
Troubleshooting Common Errors
Error Message:
ERROR REQUESTING Token FROM THE Authentication context - General ADAL Error
AADSTS650057: Invalid resource. The client has requested access to a resource which is not listed in the requested permissions in the client's application registration. Client app ID: [Your App ID]. Resource value from request: [Your Dynamics URL]. Resource app ID: 00000007-0000-0000-c000-000000000000. List of valid resources from app registration: 00000003-0000-0000-c000-000000000000.
Understanding the Error:
Error Code: AADSTS650057
Description: The application is requesting access to a resource (Dynamics CRM) that is not listed in its registered permissions.
Cause: Your Azure application is missing the necessary API permissions for Dynamics CRM.
Resolution:
Update Azure Application Permissions:
Go to the Azure Portal and navigate to your Azure AD application.
Under API Permissions, click on Add a permission.
Select Dynamics CRM from the list of APIs.
Choose the appropriate permissions (e.g., user_impersonation) and add them.
Verify Admin Consent:
For Dynamics CRM, granting admin consent is typically not required.
However, if prompted, you can proceed without granting admin consent unless your organization’s policies dictate otherwise.
Verify Redirect URI and Other Settings:
Ensure that the Redirect URI and other authentication settings match between your Azure application and DocFusion configuration.
Required Parameters for Authentication
App ID
Client Secret
Redirect URL
.png "image(24).png")
Office365 Authentication
Legacy Method (Does Not Support MFA)
Prerequisites
Dynamics Environment Without MFA: Multi-Factor Authentication must be disabled.
Required Parameters for Authentication
Username
Password
.png "image(25).png")
ActiveDirectory Authentication
Preferred On-Premises Method
Prerequisites
Active Directory Instance: An operational Active Directory must be in place.
DocFusion Platform Service and DocFusion Template Designer User Membership: Both must be part of the Active Directory.
Dynamics CRM Integration: The Dynamics CRM instance should be linked to the Active Directory.
For named account authentication, DocFusion requires:
Username
Password
Domain
.png "image(26).png")
For more details, see Named Account Using On-Premises Authentication.
Integrated Authentication
DocFusion does not require additional parameters for integrated authentication.
For more details, see Integrated On-Premises Authentication.
Configure the data source
Select the Dynamics365 Entity Type. Your selection populates the list of available fields below.
Next, specify the Occurrences. Select Single when expecting only one row of data to be returned, and Multiple for a set of rows to be returned as a dataset.
Now, use the Is Included checkboxes in the table to select those data fields that you would like import to your templates data model as properties of the data source.
When you're done, click Save. You will be returned to the Data Model pane where you can verify that the selected data fields were added to the template's schema.