Tutorial: Generate a document from a Salesforce button
- 18 Oct 2023
- 7 Minutes to read
- PDF
Tutorial: Generate a document from a Salesforce button
- Updated on 18 Oct 2023
- 7 Minutes to read
- PDF
Article Summary
Share feedback
Thanks for sharing your feedback!
In this tutorial you'll learn to add a button to the Salesforce contact page that generates a welcome letter with the first and last names of a selected contact. The letter will then be emailed to the contact using the email address saved in Salesforce and the letter will be saved to the contact's profile for referencing later.
PREREQUISITE: You must have a Connected Environment configured to generate documents using DocFusion.
Refer to the Setup a Connected Environment guide to integrate your SalesForce workspace with DocFusion.
Let's begin:
1. Add a Button to Salesforce
Buttons can be added to any Salesforce object using the Object Manager. Navigate there by opening the Salesforce setup menu (gear icon at the top-right of the page) and select Object Manager. Use the search bar to find the Contact sObject and open its configuration. Its customizations are listed in the left pane.
Add the Button Action
In the customization options, click Buttons, Links and Actions. Existing configurations for the contact sObject are displayed.
Click New Action to open the configuration for a new button action.
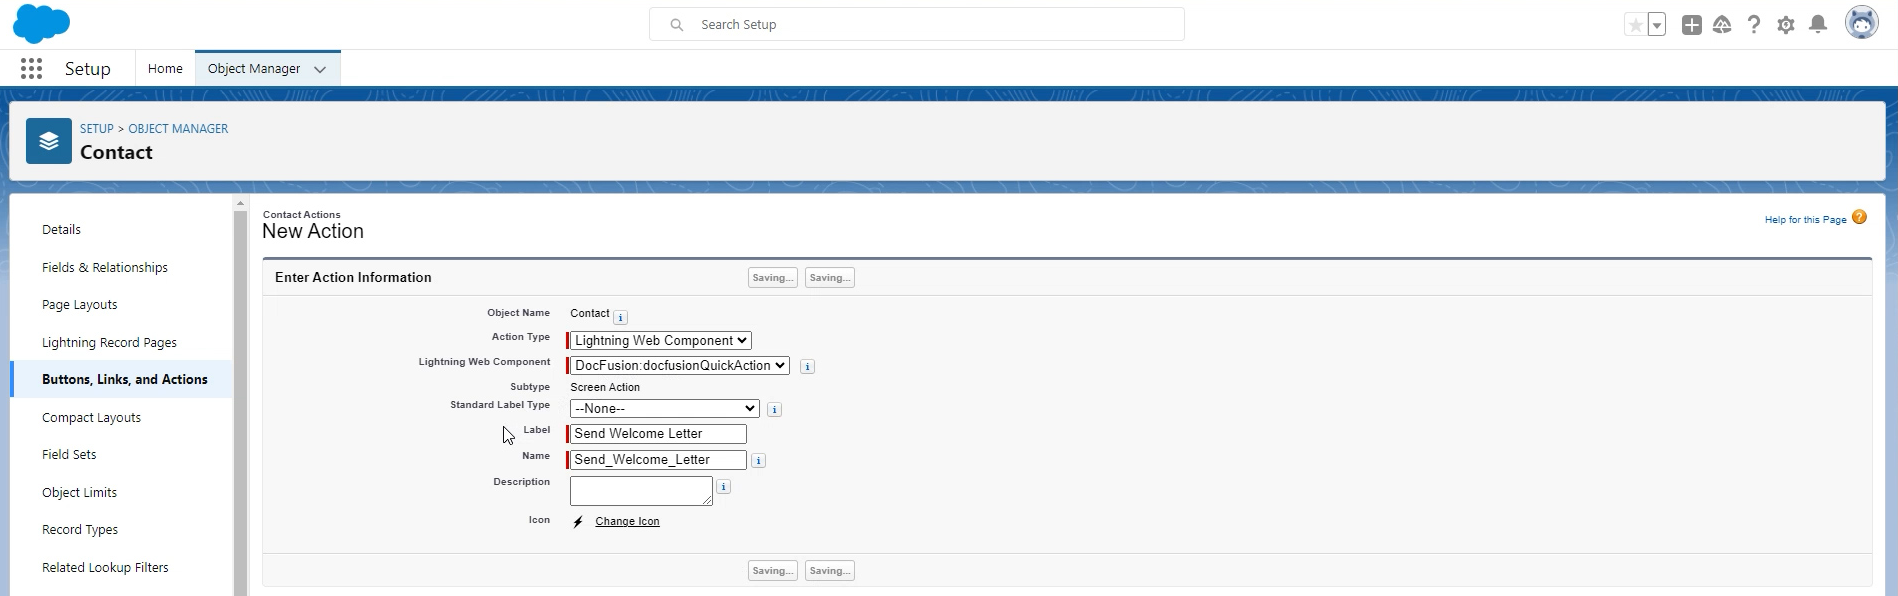
Configure the Button Action
- Select Lightning Web Component for the Action Type.
- Select DocFusion:docFusionQuickAction in the Lightning Web Component dropdown.
- Type Send Welcome Letter in the Label field.
- The Name will be auto-populated with the value send_welcome_letter. No need to change it.
Click Save to commit your changes. Salesforce displays the confirmation screen. Click the Contact link (alongside Object Name) to navigate back to the list of sObject customizations for the Contact sObject.
Adding the Button to the Page Layout
Now click Page Layouts in the list of sObject customizations. Existing page layouts for the contact sObject are displayed.
- Select the Default Page Layout to edit it. The 'welcome letter' button will be added to it.
- Click Mobile and Lightning Actions in layout settings list (left pane). This filters the action's list to locate the DocFusion button action created earlier. Identify it by its given label: "Send Welcome Letter".
- Drag the 'Send Welcome Letter' button into position by dropping it into the Salesforce Mobile & Lightning Experience Actions drop-zone below. To make sure the button is visible on the Contact page, position it first.
You may need to Override Predefined Actions to add the button.
If you are unable to drag the button into the page layout, Salesforce will need you to override the default layout for the sObject. Click the Override Predefined Actions link if you see this callout.


Click Save to commit your changes, then verify that the button appears on the contact page by navigating to the Contact sObject, selecting a contact, and scanning for it in the action bar. You may need to refresh your browser.
2. Configure the Button
Newly created buttons remain in Setup Mode until configured using the DocFusion Setup Wizard.
The first time a button is clicked after creation, the Button Setup Mode wizard opens. Once configured, buttons become functional for users. Previously configured buttons can be put back into setup mode again.
Navigate to the Contacts sObject and open the page for any contact. You should see the "Send Welcome Letter" button in the action bar. Click it. Since this is the first time the button is being clicked, the Setup Wizard opens.
[Wizard] Button Details
Configures the information shown on a modal dialog that opens when users click the button on the Contact page.
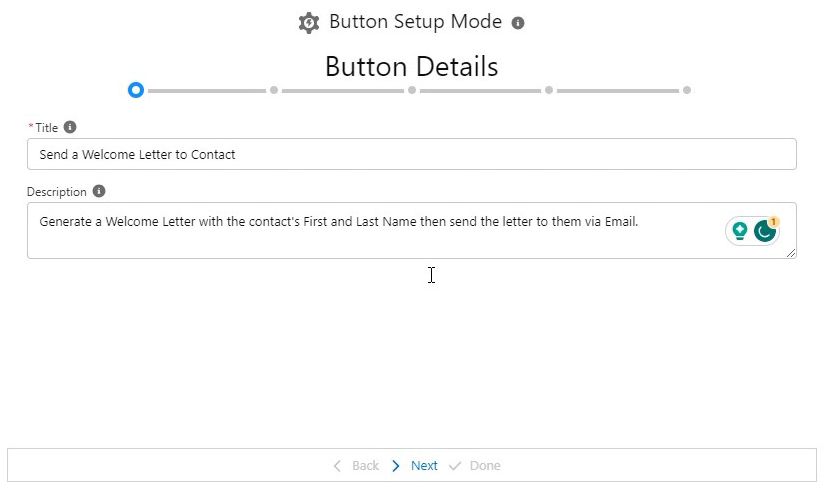
Here are the settings:
- Enter a Title: The title of the modal that helps users to understand what action they're performing. Type: "Send a welcome letter to contact".
- Provide a Description: Additional information users see in the modal window. Type: "Generate a welcome letter with the selected contact's first and last names, then email the letter to the contact using their configured email address."
Click Next to advance the wizard.
[Wizard] Document Generation
Selects, or creates, a DocFusion recipe to execute when the button is clicked. Recipes are used to generate documents and are reusable. You can select an existing recipe from the dropdown but, in this tutorial, we'll create a new one.
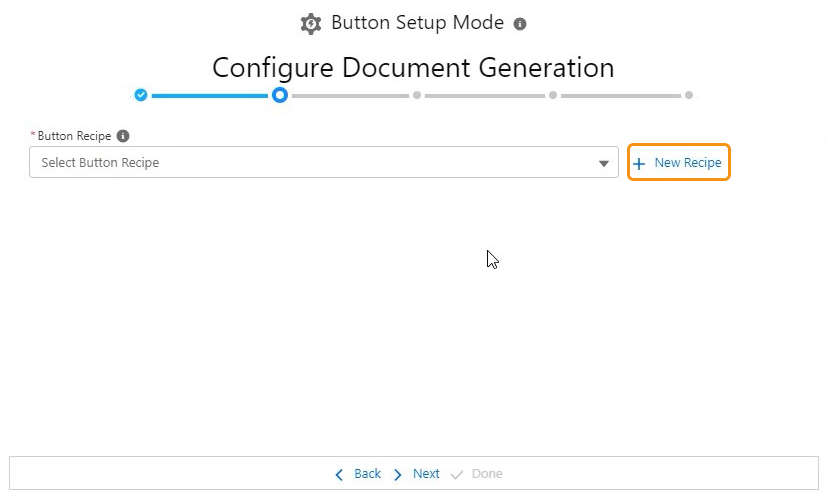
Create a New Recipe
- Click +New Recipe. A dialog opens to configure the recipe.
- Name the Recipe by typing "Welcome Letter Recipe". The name helps to identify it.
- Provide a Description for what the recipe does. Type: "Generates a welcome letter using the first and last names of the selected contact as input."
- Select a DocFusion Template from the dropdown and verify that the correct version is being used for document generation by opening the Details toggle. To design document templates, use Template Designer.
- Configure any Template Parameters by expanding the section. These are default values that will be passed to the template during generation-time. Leaving parameter fields empty allows users to provide input when triggering the button.
- Select the Output Format (Chain) for the generated document from the dropdown. Select Default.
Click Save to return to the wizard. The newly created recipe will be selected as the Button Recipe.

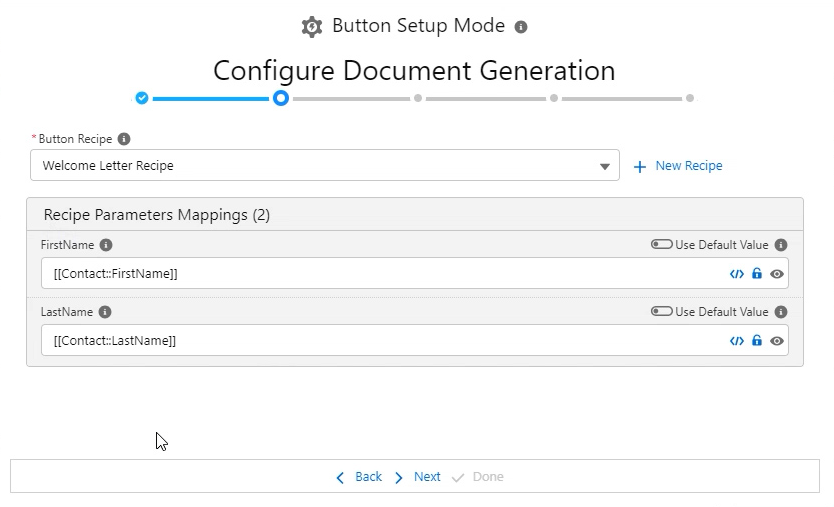
Bind Input Parameters
On the Wizard, input parameters required to execute the recipe are now listed below the Button Recipe. Mapping them binds data from Salesforce as input for the selected DocFusion Recipe. For this exercise, bind the selected contact's first and last names to the recipe to generate the welcome letter correctly.
.png)
- Open the Salesforce data browser by clicking the Insert sObject Field Data </> icon for each parameter (FirstName and LastName).
- Choose the Salesforce data field to map by finding it in the list or through search. Type firstname in the search bar and select the data field. The value [[Contact:FirstName]] will be mapped to the FirstName recipe parameter.
- For the Last Name, do the same. The field should have a mapped value like [[Contact:LastName]].
- Lock the input parameters by enabling the Lock Field icon. This prevents users from entering any other first or last names for contacts when welcome letters are generated. Letters will always be generated using the selected Salesforce contact's details.
Your configuration should be similar to the screenshot below.
Click Next to advance the wizard.
[Wizard] Test Document Generation
Testing that the welcome letter generates correctly validates your recipe and parameter configurations. Since the welcome letter retrieves the contact's first and last names from Salesforce, it doesn't need any input. If, however, your recipe does require input, or allows parameters to be overridden (parameters were unlocked), then provide that data now to test document generation with.
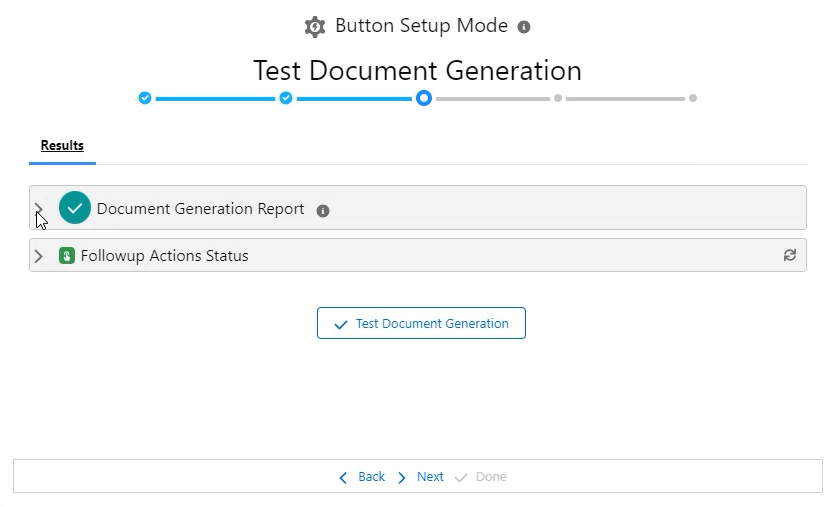
Click Test Document Generation. Generated documents open in a new browser tab where you can verify that they are addressed to the selected Salesforce contact (first and last name).
.png)
If your browser uses a popup blocker, ensure that you aren't prevented from viewing the document.

Returning to the wizard, review the report that displays the document generation logs and status of follow-up actions that were executed after document generation. Ensure that there were no generation errors. Thus far, we haven't configured any follow-up actions for the recipe so the report will be empty.
Click Next to advance the wizard.
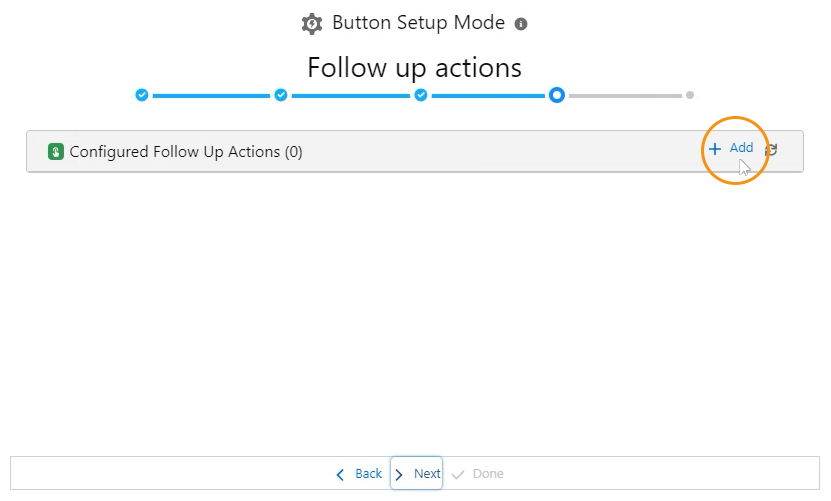
[Wizard] Follow-Up Actions
Follow-up Actions define post-processing steps that are executed after a document is generated. We will be adding multiple follow-up actions but take note that, if you don't configure at least one follow-up action, the document generated after a user clicks the "Send Welcome Letter" button will be deleted.
To ensure the welcome letter is emailed to the Salesforce contact:
- Click + Add. The configuration dialog opens.
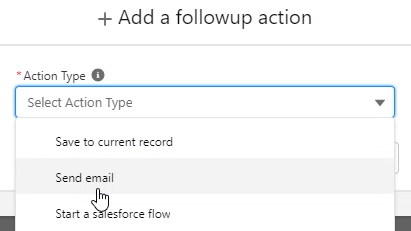
- Select an Action Type from the drop down. Select Send Email since that is the action to apply to the generated welcome letter.
- Optionally, customize the Name and Description. Standard values for the follow-up action are used otherwise.
- Configure email settings by opening the Settings toggle and clicking </> to select Salesforce data for any field. Select the contact's email address for the To field, then type "Hello new customer" into the Subject field, and enter the text "Hi [[Contact:FirstName]], please find welcome pack attached" into the Body field.
- Configure error handling by setting the Retry Attempts to 3 (default) and enabling Continue on Failure.
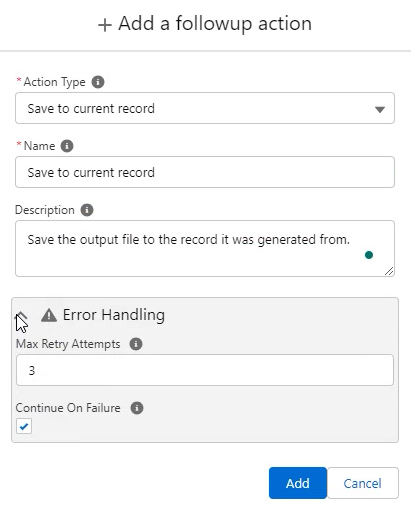
- Save the document to the current record by following the steps above to add a second follow-up action that Saves To Current Record. It has no additional settings.
Click Add to save your changes and return to the wizard. The follow-up actions that were jut created are displayed in the wizard for confirmation.
Click Next.
[Wizard] Confirm & Save
The last step of the wizard makes the button available for use in Salesforce. Activate the button by enabling the toggle, then click Done to complete the button setup and exit the wizard.
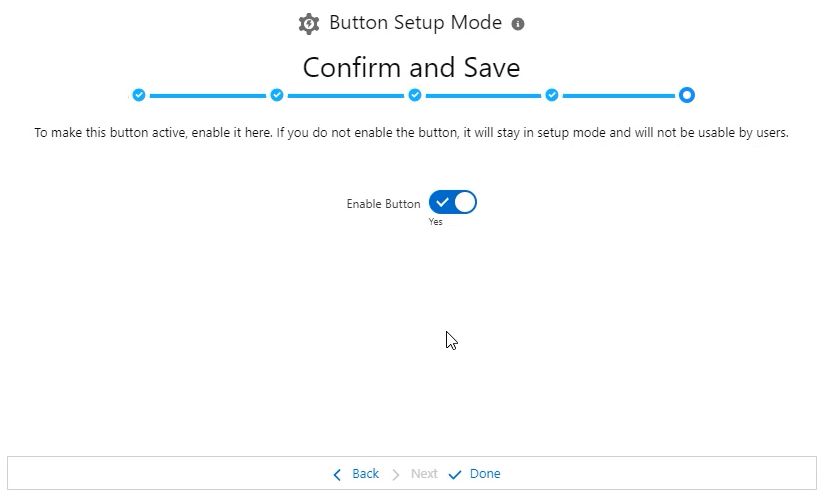
Buttons that aren't activated remain in setup mode and will not be available to users.
3. Generate the Welcome Letter
Navigate to the Contact sObject and select a contact from the list. When the contact page opens, click the "Send Welcome Letter" button. The modal window that you configured with the wizard pops-up.

Hit Submit, then:
- Verify the document by inspecting it in the browser tab that opens to display it.
- Ensure there were no errors by navigating back to modal window and opening the Generation Logs toggle.
- Confirm the status of follow-up actions by reviewing the information. Refresh status information by clicking the circular arrow icon on the right.
- Locate the saved document by closing the modal and opening the Notes & Attachments on the contact page. The welcome letter will be listed as an entry. You may need to refresh the page before the welcome letter will be listed.
If you're using a test contact, ensure you can receive emails at the configured email address.
You have now successfully generated a welcome letter using DocFusion for Salesforce.
Was this article helpful?