Feature Overview
This tutorial shows you how to create a mobile-responsive HTML emailer with content that is dynamically generated. Using Smart Parts, each email will be personalized with the recipient's first-name and last-name. It is a practical example of a common enterprise need, and demonstrates how to extend the reach of your document generation capabilities from within enterprise systems to online communications.
Hyper-Text Markup Language, or HTML, is the standard markup language for documents designed to be displayed in a web browser. It can be assisted by technologies such as Cascading Style Sheets (CSS) and scripting languages such as JavaScript (JS).
Source: Wikipedia
Smart-Parts are intelligent pieces of content used in DocFusion templates. They help to build business intelligence directly into documents.
Hyper-Text Markup Language, or HTML, is the standard markup language for documents designed to be displayed in a web browser. It can be assisted by technologies such as Cascading Style Sheets (CSS) and scripting languages such as JavaScript (JS).
Source: Wikipedia
Smart-Parts are intelligent pieces of content used in DocFusion templates. They help to build business intelligence directly into document
Hyper-Text Markup Language, or HTML, is the standard markup language for documents designed to be displayed in a web browser. It can be assisted by technologies such as Cascading Style Sheets (CSS) and scripting languages such as JavaScript (JS).
Source: Wikipedia
Smart-Parts are intelligent pieces of content used in DocFusion templates. They help to build business intelligence directly into documents.
Hyper-Text Markup Language, or HTML, is the standard markup language for documents designed to be displayed in a web browser. It can be assisted by technologies such as Cascading Style Sheets (CSS) and scripting languages such as JavaScript (JS).
Source: Wikipedia
Smart-Parts are intelligent pieces of content used in DocFusion templates. They help to build business intelligence directly into documents.
HTML Mode is an advanced DocFusion feature that supports HTML markup and CSS styling in document templates. It includes a rich set of tools to generate complex HTML documents that are intelligently assembled using Optionals (conditional statements), and are mobile-responsive for rendering on any device.
HTML Mode is useful to make your dynamically generated content available online, or through media-rich email. DocFusion eliminates the need for programming by generating HTML markup from the content of your templates.
DocFusion is a document generation engine that automates the documentation process, electronic signatures, document workflows, and secure storage for business documents.
Read more at www.docfusioncloud.com
Cascading Style Sheets (CSS) is a style sheet language used for describing the presentation of a document written in a markup language such as HTML or XML. CSS is a cornerstone technology of the World Wide Web, alongside HTML and JavaScript.
Source: Wikipedia
HTML Mode is useful to make your dynamically generated content available online, or through media-rich email. DocFusion eliminates the need for programming by generating HTML markup from the content of your templates.
DocFusion is a document generation engine that automates the documentation process, electronic signatures, document workflows, and secure storage for business documents.
Read more at www.docfusioncloud.com
Cascading Style Sheets (CSS) is a style sheet language used for describing the presentation of a document written in a markup language such as HTML or XML. CSS is a cornerstone technology of the World Wide Web, alongside HTML and JavaScript.
Source: Wikiped
HTML Mode is useful to make your dynamically generated content available online, or through media-rich email. DocFusion eliminates the need for programming by generating HTML markup from the content of your templates.
DocFusion is a document generation engine that automates the documentation process, electronic signatures, document workflows, and secure storage for business documents.
Read more at www.docfusioncloud.com
Cascading Style Sheets (CSS) is a style sheet language used for describing the presentation of a document written in a markup language such as HTML or XML. CSS is a cornerstone technology of the World Wide Web, alongside HTML and JavaScript.
Source: Wikipedia
HTML Mode is useful to make your dynamically generated content available online, or through media-rich email. DocFusion eliminates the need for programming by generating HTML markup from the content of your templates.
DocFusion is a document generation engine that automates the documentation process, electronic signatures, document workflows, and secure storage for business documents.
Read more at www.docfusioncloud.com
Cascading Style Sheets (CSS) is a style sheet language used for describing the presentation of a document written in a markup language such as HTML or XML. CSS is a cornerstone technology of the World Wide Web, alongside HTML and JavaScript.
Source: Wikipedia
As with all DocFusion Template's, content is dynamically generated. In HTML Mode, content generation is empowered with regular expressions, and the ability to reference other DocFusion templates, which themselves can be in HTML mode. The ability to nest templates allow you to develop highly structured professional communications that are personalized to a wide variety of business cases.
DocFusion Template's are documents with content that is dynamically generated to suit a business or use-case. It contains Smart-Parts, which allows the value of content to be sourced from online databases or other apps.
DocFusion Template's are documents with content that is dynamically generated to suit a business or use-case. It contains Smart-Parts, which allows the value of content to be sourced from online databases or other apps.
DocFusion Template's are documents with content that is dynamically generated to suit a business or use-case. It contains Smart-Parts, which allows the value of content to be sourced from online databases or other apps.
Availability
HTML Mode and its related features are available on:
| DocFusion Cloud | DocFusion 365 | DocFusion On Premises |
|---|
| Template Designer Version | 2022.3.0.91 or later | 2022.3.0.91 or later | 2022.3.0.91 or later |
| Workbench Version | 2022.3.0.91 or later | 2022.3.0.91 or later | 2022.3.0.91 or later |
| Workflow Designer Version | 2022.3.0.91 or later | 2022.3.0.91 or later | 2022.3.0.91 or later |
Usage Scenarios
HTML Mode in DocFusion can be implemented in simple or complex forms. Deciding which is appropriate for your business case depends on your requirements. It is recommended that you make this decision when planning DocFusion Template's that are intended for generation as HTML.
HTML Mode is useful to make your dynamically generated content available online, or through media-rich email. DocFusion eliminates the need for programming by generating HTML markup from the content of your templates.
DocFusion is a document generation engine that automates the documentation process, electronic signatures, document workflows, and secure storage for business documents.
Read more at www.docfusioncloud.com
DocFusion Template's are documents with content that is dynamically generated to suit a business or use-case. It contains Smart-Parts, which allows the value of content to be sourced from online databases or other apps.
HTML Mode is useful to make your dynamically generated content available online, or through media-rich email. DocFusion eliminates the need for programming by generating HTML markup from the content of your templates.
DocFusion is a document generation engine that automates the documentation process, electronic signatures, document workflows, and secure storage for business documents.
Read more at www.docfusioncloud.com
DocFusion Template's are documents with content that is dynamically generated to suit a business or use-case. It contains Smart-Parts, which allows the value of content to be sourced from online databases or other apps
HTML Mode is useful to make your dynamically generated content available online, or through media-rich email. DocFusion eliminates the need for programming by generating HTML markup from the content of your templates.
DocFusion is a document generation engine that automates the documentation process, electronic signatures, document workflows, and secure storage for business documents.
Read more at www.docfusioncloud.com
DocFusion Template's are documents with content that is dynamically generated to suit a business or use-case. It contains Smart-Parts, which allows the value of content to be sourced from online databases or other apps.
HTML Mode is useful to make your dynamically generated content available online, or through media-rich email. DocFusion eliminates the need for programming by generating HTML markup from the content of your templates.
DocFusion is a document generation engine that automates the documentation process, electronic signatures, document workflows, and secure storage for business documents.
Read more at www.docfusioncloud.com
DocFusion Template's are documents with content that is dynamically generated to suit a business or use-case. It contains Smart-Parts, which allows the value of content to be sourced from online databases or other apps.
Simple HTML Mode
As a markup language, HTML allows you to describe content with metadata. While it is the universal language of the world wide web, the need to render HTML documents with sophisticated styling is not always a priority. Reports that communicate tabular or list-based information are an example of documents that benefit from the portability of HTML but need only basic styling rules. The structure and confidentiality of the information take precedence in such use-cases.
Hyper-Text Markup Language, or HTML, is the standard markup language for documents designed to be displayed in a web browser. It can be assisted by technologies such as Cascading Style Sheets (CSS) and scripting languages such as JavaScript (JS).
Source: Wikipedia
Hyper-Text Markup Language, or HTML, is the standard markup language for documents designed to be displayed in a web browser. It can be assisted by technologies such as Cascading Style Sheets (CSS) and scripting languages such as JavaScript (JS).
Source: Wikipedia
Hyper-Text Markup Language, or HTML, is the standard markup language for documents designed to be displayed in a web browser. It can be assisted by technologies such as Cascading Style Sheets (CSS) and scripting languages such as JavaScript (JS).
Source: Wikipedia
‘Simple’ HTML Mode in DocFusion caters to those requirements. Using DocFusion Chains, you have the option to produce HTML-compliant documents as HTML pages or email format, which contain content that is dynamically generated using DocFusion’s plethora of Smart Parts.
DocFusion Chains define the output formats of documents generated by DocFusion. They support a variety of document formats, like PDF, docx, etc., and can be configured for advanced security and compatibility settings.
Smart-Parts are intelligent pieces of content used in DocFusion templates. They help to build business intelligence directly into documents.
If the requirements of your use-case places priority on content integrity rather than refined styling, then simple HTML Mode is a good choice. DocFusion will additionally give you control over mobile breakpoints to render your document satisfactorily in browsers on any device. You also have access to the document’s stylesheet to add custom CSS rules.
HTML Mode is useful to make your dynamically generated content available online, or through media-rich email. DocFusion eliminates the need for programming by generating HTML markup from the content of your templates.
Cascading Style Sheets (CSS) is a style sheet language used for describing the presentation of a document written in a markup language such as HTML or XML. CSS is a cornerstone technology of the World Wide Web, alongside HTML and JavaScript.
Source: Wikipedia
Complex HTML Mode
When your document templates require finer control over both structure and content then complex HTML Mode is likely to be a better choice for your template. This is often the case in Customer Communications Management (CCM) use-cases or to meet Customer Experience (CE) objectives.
Typically, the artefacts that are created from these business processes are mobile-responsive emails and HTML pages. Their requirements usually include the enforcing of branding rules, pixel-perfect layouts that adapt to a variety of devices, and entire content sections that are generated according to the values of Smart Parts.
Smart-Parts are intelligent pieces of content used in DocFusion templates. They help to build business intelligence directly into documents.
Smart-Parts are intelligent pieces of content used in DocFusion templates. They help to build business intelligence directly into documents.
Smart-Parts are intelligent pieces of content used in DocFusion templates. They help to build business intelligence directly into documents.
Smart-Parts are intelligent pieces of content used in DocFusion templates. They help to build business intelligence directly into documents.
Smart-Parts are intelligent pieces of content used in DocFusion templates. They help to build business intelligence directly into documents.
As opposed to simple HTML Mode, complex HTML Mode in DocFusion affords greater control over how HTML documents are constructed. DocFusion provides a variety of tools to dynamically generate Document Object Models (DOM’s) and manipulate the presentation of content that fills the HTML markup.
DocFusion is a document generation engine that automates the documentation process, electronic signatures, document workflows, and secure storage for business documents.
Read more at www.docfusioncloud.com
DocFusion is a document generation engine that automates the documentation process, electronic signatures, document workflows, and secure storage for business documents.
Read more at www.docfusioncloud.com
DocFusion is a document generation engine that automates the documentation process, electronic signatures, document workflows, and secure storage for business documents.
Read more at www.docfusioncloud.com
DocFusion is a document generation engine that automates the documentation process, electronic signatures, document workflows, and secure storage for business documents.
Read more at www.docfusioncloud.com
DocFusion is a document generation engine that automates the documentation process, electronic signatures, document workflows, and secure storage for business documents.
Read more at www.docfusioncloud.com
Key Concepts
Complex HTML mode can be implemented in a variety of ways and these concepts will help to tailor your template designs to your use-case:
| Concept | Function |
|---|
Wrappers | Overrides a DocFusion template’s content with HTML, and facilitates a custom HTML structure for the document. Wrappers essentially provide a framework HTML structure that controls the layout and styling of content within. Dynamically-generated content is placed within HTML using references, expressions and other DocFusion tools or Smart Parts. |
| External References | Allows you to reference any DocFusion template in your repository. The content from referenced templates is pulled into wrapper templates and styled according to the rules of the wrapper template. References can point to HTML Mode templates or to DocFusion templates without HTML mode enabled. |
| Library Elements | Smart-Part that lets you identify content within a DocFusion template so that it can be referenced in other templates or wrappers. Library elements can be of any content type, e.g.: text, table, image, etc. |
| Expressions | Expressions are a powerful tool that is available in all DocFusion templates. It helps you to evaluate content based on math, logical operators, constants and other formula calculations. In HTML mode, expressions can be directly embedded in HTML. |
| Optionals | Are the equivalent of programmatic ‘if-else’ statements, or conditional logic, that help you to build HTML intelligently. By using optionals, you can generate Document Object Model’s (DOM) based on criteria that exist in your template content or data model. |
| Breakpoints | Specifies the pixel dimensions of an HTML mode template. Breakpoints function the same as CSS media queries to adapt HTML documents to the screen it is being viewed on. In DocFusion, you can create breakpoints for as many devices as you like and the CSS is generated accordingly for you. |
| Word Document Reference | Similar to external references, this tool allows you to refer to content in Microsoft Word documents to insert into your HTML. You can reference the content of entire Microsoft Word documents, or content elements within, like sections. |
| Insert HTML | Allows to import HTML into your HTML mode document template. Useful If you’ve already designed HTML markup that you would like to use as a wrapper framework for your template content. |
Tutorial Steps
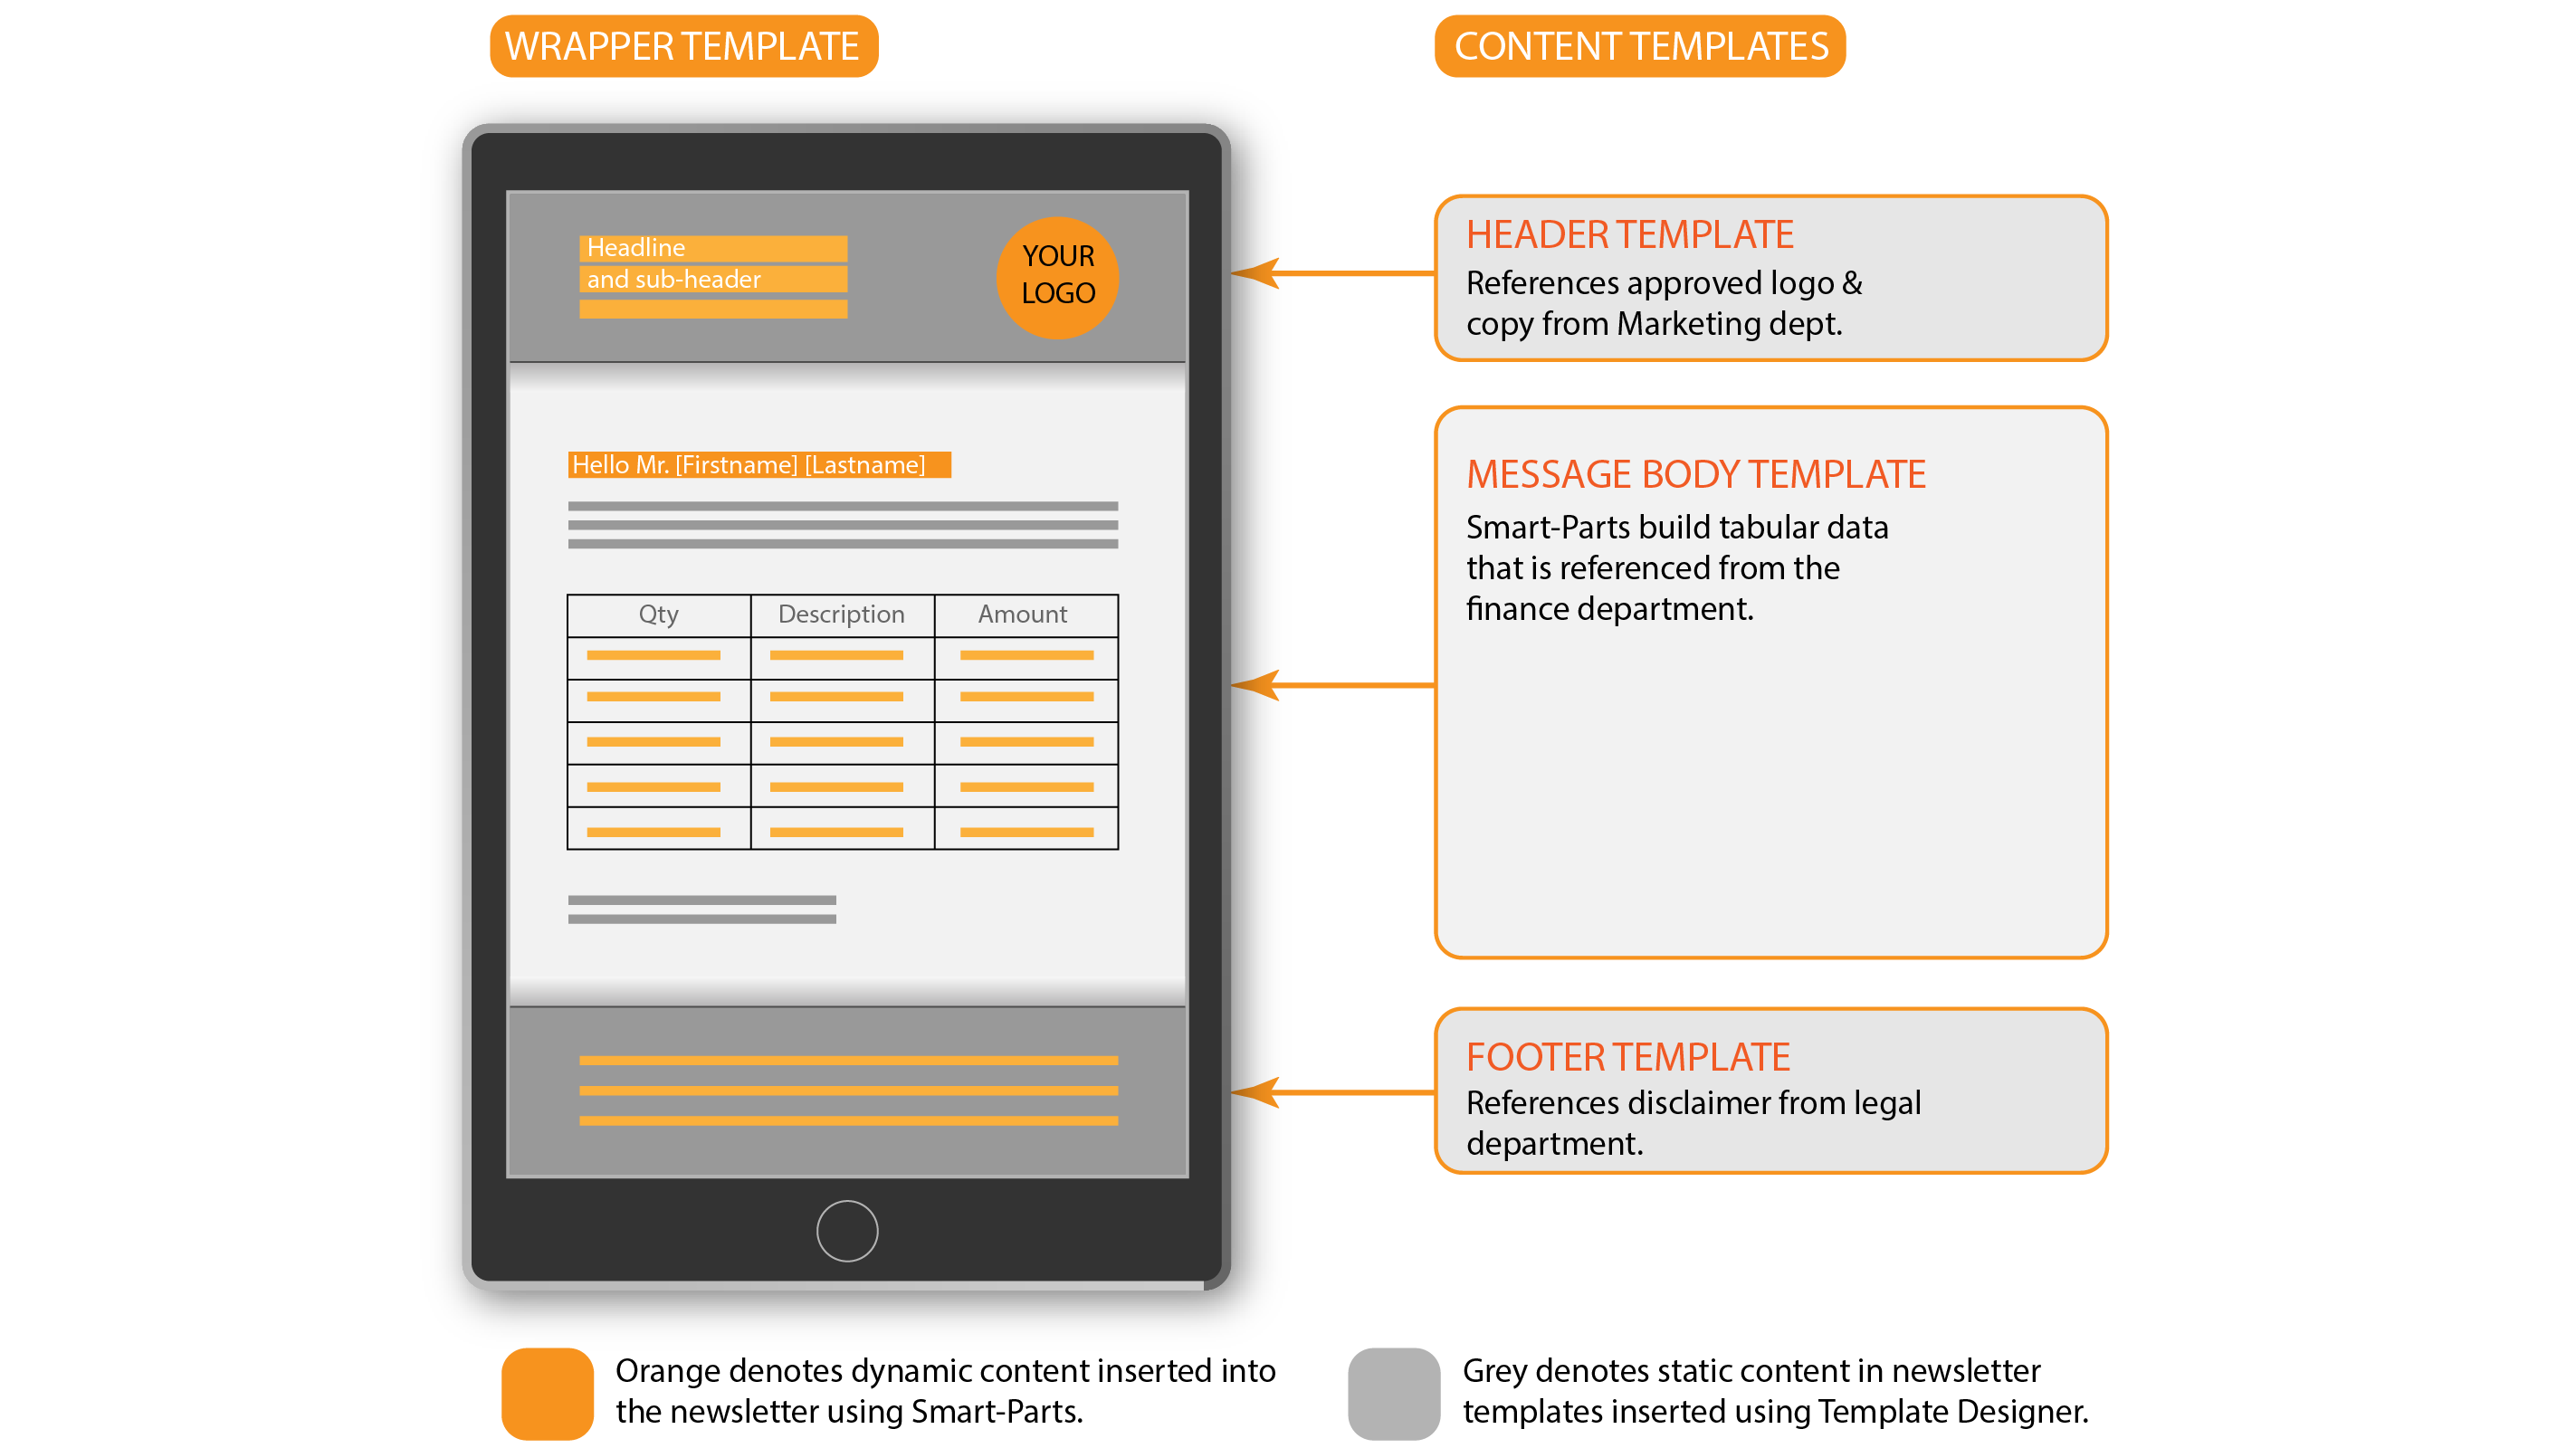
The objective of this tutorial is to design a set of DocFusion content templates that generate a mobile-responsive email newsletter. The header, footer and message body all exist in separate content templates that are pulled into a DocFusion HTML wrapper template. This structure is useful when the content of your documents are owned and managed by different departments in your business who enforce their own stylistic or compliance rules.
Step 1: Activate HTML Mode for your wrapper template
DocFusion Document Extension
To use HTML Mode, you must first extend your Microsoft Word document for dynamic content generation using DocFusion.
- As best-practice, use the DocBench application to create a DocFusion template on your server and check it in.
- Immediately after, check out the template again and click Edit from the Items menu. The template will open in Microsoft Word, allowing you to begin editing it.
- Scan for the ‘Enable HTML Mode’ tool in the ribbon bar. Click it. The HTML Settings window will open. Your document is now HTML Mode enabled.
.png) HTML Settings are available after enabling HTML Mode.
HTML Settings are available after enabling HTML Mode.
Step 2: Create your Wrapper HTML
The wrapper is the DocFusion template that assembles content referenced in other templates. It governs the layout and styling for all nested templates.
To create yours:
- In the ‘HTML Settings’ window, navigate to the tab “Replace Document with HTML’. You can now edit the HTML directly in the code editor. Enter the HTML code below into the editor. It sets up a tabular structure for the newsletter.
- Next, click the 'CSS' tab. Enter the CSS rules below into the editor. These styles will govern the contents of the newsletter that is referenced in nested templates.
| HTML Wrapper Code | CSS Rules |
|---|
<html>
    <table id="center">
        <tr>
                <!--Header HTML Content-->
        </tr>
        <tr>
                <!--Message Body Content-->
                <td colspan="2"><wrapper-content/></td>
        </tr>
        <tr>
                <!--Footer HTML-->
        </tr>
    </table>
</html>
| #center {
border-collapse: collapse;
width: 40%;
margin: auto;
background-color: #dddddd;
}
#center td, #customers th {
border: 1px solid #ddd;
padding: 10px;
}
#center tr:nth-child(even) {
background-color: #f2f2f2;
}
#center tr:hover {
background-color: #ddd;
}
#logo {
float: right;
}
|
Step 3: Create Header Template and Reference in the Wrapper
- To setup a header for the newsletter, create a new DocFusion template using your Workbench application. Check it out, and open it for editing, which will open the template in Microsoft Word.
- Convert your template to HTML mode by clicking 'Enable HTML Mode' in the advanced group of DocFusion tools.
- In the 'HTML Settings' window, navigate to the tab 'Replace Document with HTML'. In the editor, copy the HTML code below. It defines the HREF location of your logo in the anchor tag (<a href="") and the heading of the newsletter, You can customize the values of the <img> tag URL and heading text in the <p> tag.
<td>
        <p style="text-align: center; font-size: 30px;">Recent Account Activityp>
td>
<td>
        <img id="logo" src="https://location.to/your-logo.png" alt="Company Logo" width="100%" height="100%">
td>
- When you're done designing your template, open DocFusion Workbench and check-in your header template into the repository. This makes the content you've just created available to your wrapper template.
- Next, reference the header in your wrapper HTML. Do this by switching windows to your wrapper template. Open the HTML Settings window and navigate to the HTML editor tab. Place your cursor in the first table row, between the <tr> and </tr> elements, where the comment <!--Header HTML Content--> is located. The content in your header template will be placed here when rendering the HTML newsletter.
- Click the 'Insert External Reference' button in the toolbar. The 'Edit External Reference' dialog will open.
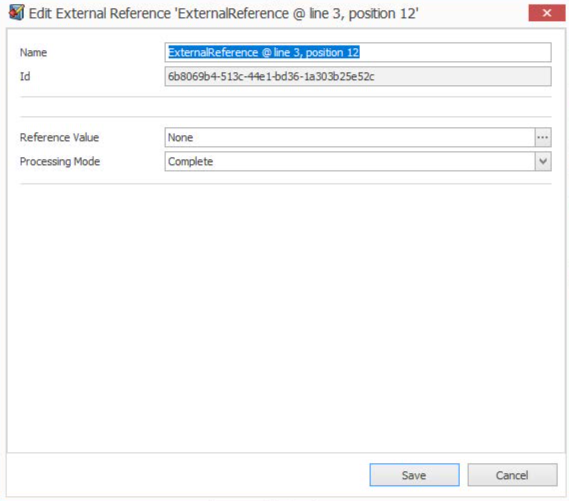 Edit External Reference Dialog.
- In the 'Reference Value' field, click the ellipses. The template chooser dialog will open to help you select the header template you created earlier.
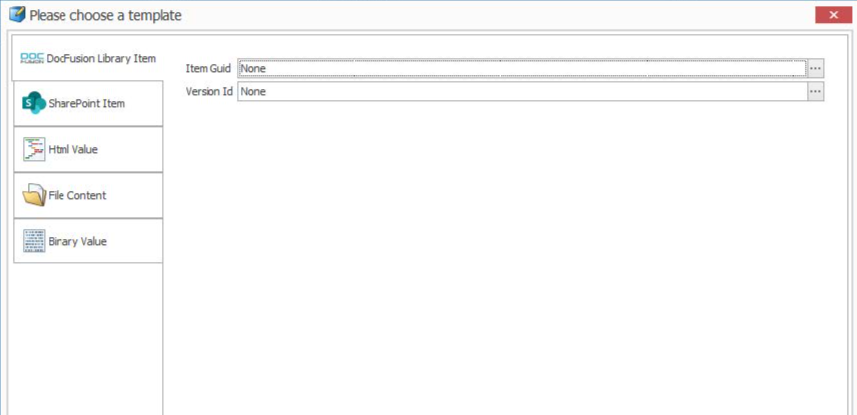 Template chooser dialog.
- Now you can specify the header template to use for the newsletter. Click the ellipses alongside the 'Item GUID' field. The contents of the dialog changes to the 'Constants' selector. You can either paste in the GUID of the header template you created, or click the ellipses alongside the field to select the template in the 'DocFusion Library Item' dialog. Find your template in the list and click 'SELECT'. The unique GUID of your template will automatically be entered into the 'DocFusion Library Item' dialog. No click 'Save'.
- Next, you will be prompted to select the version of the template to reference. Since you've just created the first version of the template, select 'none' in the 'Version ID' field and click the ellipses alongside. The 'Library Item Version' dialog will open. Select "*" in the list, which is a template described as "The latest version, regardless of the master". When you click 'Select' the dialog box will close.
- Click 'Save' in the following dialog boxes until you return to the 'HTML Settings' window. The header template has now been referenced in your wrapper HTML and will render if you preview the template.
Step 4: Create Footer Section and Reference in Wrapper
The template for the footer section does not need to be set to HTML mode since we are only referencing text that reflects a disclaimer. To do so:
- Create a new DocFusion template using your Workbench application. Check in the template, then immediately check it out, and edit it to open the template in Microsoft Word.
- Next, on the document canvas, type some text that you would like to use as a disclaimer.
- Save and close your document, then check it in to the DocFusion repository using DocFusion Workbench.
- Now, switch windows to your wrapper template and place your cursor between the <td> elements in the footer section. As in Step 3, this is where the reference to the disclaimer will be placed in the newsletter.
- Click 'Insert External Reference' in the toolbar again and create a reference to your footer template using the same method as Step 3. When you're done, the reference tag should appear in the HTML editor in the position where the newsletter footer is laid out, just as it had when referencing your header in Step 3.
Step 5: Create Message Body and Reference in Wrapper
The message body for your wrapper template is created and referenced in the same way as the preceding steps.
Design the content of your email body template as you wish. You can even generate dynamic content by dragging DocFusion Smart Parts onto the document canvas. Be aware though that, if you are using Smart-Parts, you will need to also design a Data Schema for your template.
A DocFusion feature that manages connections to enterprise databases and systems, or online apps, and makes their data available to DocFusion templates.
For detailed guidance on creating Data Schema's for DocFusion templates, please refer to the Tutorial: Define the template's Data Schema
Once you've completed creating the message body, reference the HTML wrapper from your message template. This step is different from the others because when you use the <wrapper-content/> tag in the wrapper template, you're essentially telling DocFusion where to include your body content . This is an alternative way of including content in the wrapper template as opposed to referencing content as we have in the previous steps.
To complete this task, follow these steps:
- To begin, set your message body template to HTML Mode by clicking the tool in the ribbon bar.
- When the HTML Settings window opens, click Insert Wrapper in the toolbar. The External Reference dialogue will open.
- Now select your HTML Wrapper template as the reference by following the same procedure as Step 3.
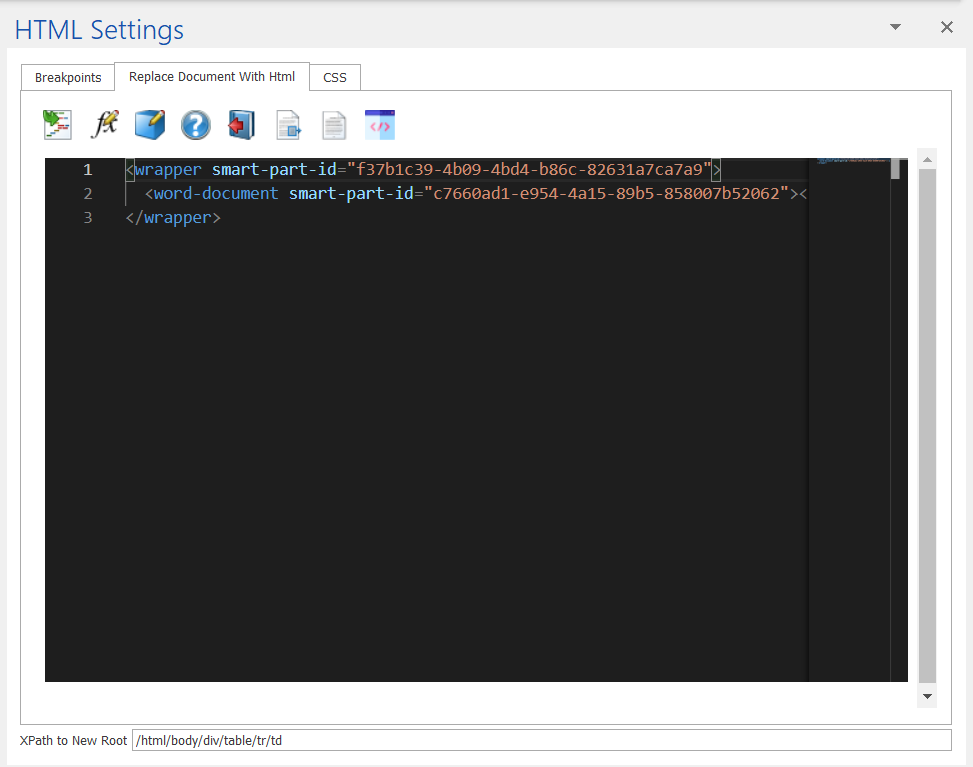
- Lastly, we need to inform the HTML Wrapper what content to wrap in the HTML. In this it happens to be the message body template that is currently open. So, in the HTML Settings window, click Insert Word Document and select your current template as the content to insert into the wrapper. Your HTML settings should look as follows:
Step 6: Previewing in Multiple Formats
You can now preview your newsletter:
- Switch windows to your wrapper template. When using HTML mode, previews are available as HTML pages or as an email body. In the ribbon bar, find the option 'Type' in the 'View' group of tools and select 'HTML'.
- Directly below is the preview button. Click it. Your system's default browser will open with your newsletter preview.
- If you've used Smart-Parts for any content in the message body, header or footer templates, then you can set the runtime parameters for them using the scenarios feature. They will apply when previewing as email too.
Review
DocFusion HTML mode provides template designers with powerful tools to customize the structure and content of HTML documents. The tools available to generate intelligent HTML and email range in functionality, and cater to a wide variety of use-cases. The nested structure used in this tutorial represents a best-practice for common use-cases in enterprise environments. Businesses are encouraged to use HTML mode for professional HTML and CSS documents that are mobile-responsive.
Additional Resources
A comprehensive HTML and CSS reference is available at MDN Web Docs.
Hyper-Text Markup Language, or HTML, is the standard markup language for documents designed to be displayed in a web browser. It can be assisted by technologies such as Cascading Style Sheets (CSS) and scripting languages such as JavaScript (JS).
Source: Wikipedia
Smart-Parts are intelligent pieces of content used in DocFusion templates. They help to build business intelligence directly into documents.
HTML Mode is useful to make your dynamically generated content available online, or through media-rich email. DocFusion eliminates the need for programming by generating HTML markup from the content of your templates.
DocFusion is a document generation engine that automates the documentation process, electronic signatures, document workflows, and secure storage for business documents.
Read more at www.docfusioncloud.com
Cascading Style Sheets (CSS) is a style sheet language used for describing the presentation of a document written in a markup language such as HTML or XML. CSS is a cornerstone technology of the World Wide Web, alongside HTML and JavaScript.
Source: Wikipedia
DocFusion Template's are documents with content that is dynamically generated to suit a business or use-case. It contains Smart-Parts, which allows the value of content to be sourced from online databases or other apps.
DocFusion Chains define the output formats of documents generated by DocFusion. They support a variety of document formats, like PDF, docx, etc., and can be configured for advanced security and compatibility settings.
A DocFusion feature that manages connections to enterprise databases and systems, or online apps, and makes their data available to DocFusion templates.